After our first week of having an Elf I have to say I love it. It is SO much fun finding new G-rated and not-so G-Rated things to do with her ;-) Cowgirl Marshmallow here is embracing her new digs in The Cowboy Capital of the World.
But the night before, she celebrated a LITTLE TOO HARD ...
and I worried when we found her the next morning drinking a bottle of syrup!
I was right, her hangover was EPIC LOL
But she recovered in time to leave the kids a little reminder on NOT TOUCHING HER! Which is funny because it was directed at the middle two kids, and not the youngest! And she had NO PROBLEM reminding her older siblings of the message ALL DAY LONG ;-)
She spent the next day just hangin around ... badumBUM TISH! lol She was building up to last night ...
Marshmallow and her creepy button eyed minions (aka Lalaloopsy dolls) decided that Barbie's reign of power WAS OVER ...
LOL oh man I love this creepy thing!
December 13, 2012
December 11, 2012
Burlap and Lace Ruffled Table Runner
This year I've gone with a new color scheme. It's a more neutral tones and elements, plus red/cream/white. I needed something to go on the table so yet again I embraced the burlap! There isn't really any sewing involved either, except a running stitch in the ribbon to make the ruffle but you could do that with the hot glue gun too if you really wanted it NO SEW :)
Supplies:
Burlap, cut to fit your table (mine is 38"x10")
Lace, cut to fit inside the burlap as a strip (mine is cut 29"x6")
1.5" Satin Ribbon
Hot glue gun/glue
Sewing machine/thread
Step 1: Cut your burlap. I read a super great tip on how to get straight lines. Take a string where you want to cut and pull it all the way out. Now you have a line you can follow!
Step 2: Cut your ribbon. I decided on 3 layers of ruffles on both sides so you need 6 strips of 1.5" satin ribbon cut 1.5 times the length of the burlap. So my ribbon is 10" wide, so I cut my ribbon 15". The I ran it on the sewing machine with the widest setting so I could gather it.
Step 3: Gather the ribbon to the length of the burlap.
Step 4: Hot glue your ribbon to the bottom corner of the burlap. Make sure you have something plastic under the burlap because the hot glue with seep through, I used a lid from one of my Christmas tubs ;-) Then glue the other side.
Step 5: Glue the rest of the ribbon in place. I did both ends first, then the middle, then each side. It seemed to help keep it even on each side that way.
Step 6: Do the next 2 rows the same way. Now if you want to glue down your lace (I didn't because I might want to change it up) you can glue it down under the 3rd layer of ruffles. Trim the sides and fire up your ribbon ends to prevent fraying.
Step 7. Lay out your lace if you haven't already glued it in place.
Looks so pretty! Would you believe this "lace" is actually a window panel I didn't use anymore? LOL It's being put to good use now :)
Step 8: Add some holiday candles and you're DONE BABY!
I went and added some little ornaments too and I really like how it came out.
It's just perfect for our everyday holiday table.
It fits perfectly on the table without really getting in the way of our daily activities which is AWESOME since we use this table for pretty much everything lol. And it was SUPER easy and fast to make!
Supplies:
Burlap, cut to fit your table (mine is 38"x10")
Lace, cut to fit inside the burlap as a strip (mine is cut 29"x6")
1.5" Satin Ribbon
Hot glue gun/glue
Sewing machine/thread
Step 1: Cut your burlap. I read a super great tip on how to get straight lines. Take a string where you want to cut and pull it all the way out. Now you have a line you can follow!
Step 2: Cut your ribbon. I decided on 3 layers of ruffles on both sides so you need 6 strips of 1.5" satin ribbon cut 1.5 times the length of the burlap. So my ribbon is 10" wide, so I cut my ribbon 15". The I ran it on the sewing machine with the widest setting so I could gather it.
Step 3: Gather the ribbon to the length of the burlap.
Step 4: Hot glue your ribbon to the bottom corner of the burlap. Make sure you have something plastic under the burlap because the hot glue with seep through, I used a lid from one of my Christmas tubs ;-) Then glue the other side.
Step 5: Glue the rest of the ribbon in place. I did both ends first, then the middle, then each side. It seemed to help keep it even on each side that way.
Step 6: Do the next 2 rows the same way. Now if you want to glue down your lace (I didn't because I might want to change it up) you can glue it down under the 3rd layer of ruffles. Trim the sides and fire up your ribbon ends to prevent fraying.
Pretty huh? :)
Add the ruffles to the other side of the table runner. See now this is a nice base runner, you can totally change it up with the seasons or holidays :)Step 7. Lay out your lace if you haven't already glued it in place.
Looks so pretty! Would you believe this "lace" is actually a window panel I didn't use anymore? LOL It's being put to good use now :)
Step 8: Add some holiday candles and you're DONE BABY!
I went and added some little ornaments too and I really like how it came out.
It's just perfect for our everyday holiday table.
It fits perfectly on the table without really getting in the way of our daily activities which is AWESOME since we use this table for pretty much everything lol. And it was SUPER easy and fast to make!
December 9, 2012
Weekend Catch Up
We had a fun old fashioned family Christmas weekend and I loved it :) Friday night we started with a Christmas movie night! We had home made hot chocolate, cookies, and watched The Santa Claus. It was fun to cuddle on the couch and watch it with the girls :)
Saturday we started out EARLY with the arrival of Marshmallow ;-) but we didn't really get going until around 11 when I decided to take the girls shopping. They made their lists of people they wanted to get gifts for, finalized their budgets, decided what to buy/make for each person, and then made a list of what they needed from the stores. Busy morning!! We went to the dollar store, and then to lunch :) Then we hit up Walmart and oh my word ... it was crazy town. I only went there because I forgot to pick up my photos the day before ;-) Now when we got there at 1:00 they were backed up so we did our shopping and came back, they were STILL backed up. We went and paid for our stuff, came back, and they were STILL backed up. This time we stayed because they lady said my stuff was "almost done" ... an HOUR LATER ... they FINALLY printed. I got 2 extra 8x10s out of it though so ya know ;-)
The girls did SO WELL the whole time, like REALLY REALLY WELL. I love being with them so much, they are SO funny and so fun to be around! We just had the best time :)
Now yesterday Marshmallow and I celebrated her arrival with a glass of wine but last night she didn't even want to share!! I told her Sharing is CARING, Marshmallow!! but she wouldn't hear of it!
The girls woke up to this though ;-) And I'm concerned about how a bottle of syrup is going to do following a bottle of wine for poor Marshmallow ;-)
Today we spent the day crafting and doing Christmasy stuff :) I made this pretty burlap and lace table runner!
And my middle girl made these ADORABLE Harry Potter pillows for my oldest :) They are the CUTEST THINGS!! I'll be posting a tutorial soon! They are so easy and made of felt, cream colored fabric, and Wonder Under! SHE IS GOING TO FLIP!
It's been such a great weekend but I'd be lying if I said I wasn't ready for school tomorrow ;-) SO MUCH TO GET DONE STILL!
December 8, 2012
So You've Decided to Get An Elf
This year we've adopted an Elf :) It was hard to find (read: my 2 Targets were out and I had to go to a Barnes and Noble lol) but we are now the proud family of Marshmallow!
She showed up last night and my youngest was SO EXCITED! They have an elf in her class, and her friends have elves, and she told her just last night that she wanted an elf SO VERY BADLY. I had already found Marshmallow by then so I couldn't WAIT for her to find her!
She got right to business ;-) She wanted to make sure that we all knew how to care for the elf, the do's and don'ts, so that Marshmallow doesn't loose her magic ;-)
She read her book to her daddy and I, and we tried really hard to pay attention, did I mention that it was 5:45 in the morning?? We were SUPER tired, partly because we got up so early, and partly because ...
Marshmallow and I were up too late celebrating her arrival ;-)
Oh that girl is a party animal! Can't wait to see the trouble she gets into!
December 5, 2012
Dollar Store Stockings
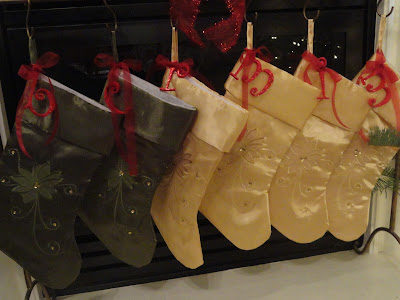
So last year I decided that I wanted to replace my mismatched but sweet stockings with some that matched my decor but I didn't have a lot of time or money to spend. Off to the Dollar Store!!
I found some simple but pretty satin stockings and knew I could personalize them pretty easily. I liked the green and gold colored stockings but not so much the red ones. So I got 4 gold for the kids, 2 green for the hubs and I, and red paint for the embellishments.
Supplies:
Stocking
Wooden letter (I got these at Hobby Lobby but have seen some at the dollar store)
Paint/paint brush
Glitter
Glue
Ribbon
Step 1: Paint your letter and let it dry.
Step 2: Paint letter face with glue and sprinkle with glitter, let dry.
Step 3: Now just take secure your letter to your stocking with the ribbon and DONE!
I LOVE how they came out!! They totally fit in with my color scheme.
And they were so easy to make!
They look so perfect with the rest of my mantel and tree!
December 4, 2012
Quick Christmas Gift for a Teacher
They love getting involved! We made Christmas Hugs, Peppermint Bark, Christmas Brownies (which are just brownies with Christmas M&Ms and sprinkles on top lol), and some awesome chocolate cookies.
Then I assembled everything I needed for the gift baskets, most of which I had
Tin basket
Cello bags
Shredded basket filler
Gift basket cello bags
Wired ribbon
Satin ribbon
Baked Yummies
Pretty candle (Yankee Candles, on sale at Walgreens on Thanksgiving B1G2Free!)
I filled the cello bags with the goodies, one with bark and hugs, one with cookies and brownies. Then tied them off with red and green satin ribbons.
I filled the basket with the shredded paper filler and put the treats on either side of the candle.
Next I took the basket bag, placed the basket inside and wrapped it with a pretty bow :) DONE! And it looks SO pretty!
December 2, 2012
DIY Christmas Card Holder
I started with a premade metal sign from Hobby Lobby (75% off since I wanted so long ;-), some scrapbook letter stickers, a few different sizes/colors of ribbon, and some clothes pins that I fancied up :)
To fancy up the clothes pins I painted them with gold glitter glue and then sprinkled with red and gold glitter!
I stuck the scrapbook letters on the metal sign to spell out "Merry Christmas Mail" :)
Then I hung up the sign to measure how long I wanted the ribbons to hang
I cut the ribbon and hot glued them in place
After it was dry, I hung it up and tried it out
I made a pretty little spot for it to wait for the pretty cards to arrive!
And had the pretty clothes pins waiting in a little spot below
I got a few more cards than I was expecting and my card holder FILLED UP FAST!! I LOVE how it came out :)
Subscribe to:
Posts (Atom)


